
A Guide to Using the Face Sheet
The Face Sheet functions as a customizable care record, providing a snapshot of essential administrative, medical, and personal information about each service user. This feature ensures that important details are easy to access at a glance, while still being flexible enough to meet the needs of different care settings.
What Information Appears in the Face Sheet?
The Face Sheet includes default fields, customizable fields and auto-populated fields.
Default Fields (cannot be removed):
Assessment Scores - displays results of any scored forms or assessments
Preferred Activities - displays activity types the participant attends most often
Linked Fields (pulled from other areas in StoriiCare):
Groups
Services (from Billing)
Billing Plans (from Billing)
Payors (from Billing)
Vital Signs (from Vital Signs)
Medical Conditions (from Medical Info)
Medications (from Medical Info)
Custom Fields
Anything else can be tailored within the Face Sheet Settings, allowing your organization to capture additional data points that matter.
How to Edit the Face Sheet Template
Navigate to the Face Sheet within any participant's profile.
Note: The changes you make to the template apply system-wide, so it doesn’t matter which profile you edit from.
Click the Settings Cog/Wheel at the top of the Face Sheet page.
If you don’t see this option, your Permission Level may not allow it. Contact a manager for access.
From the Settings view, you can:
Search for a specific field using the Filter field names search bar.
Delete a field using the red trash bin icon.
Create a new field by clicking + Add Field in the desired location.
Reorder fields using the up (^) and down (v) arrows.
Rename a field by clicking on its current label.
Adjust the Field Type and Toggles (covered below).
Face Sheet Field Types
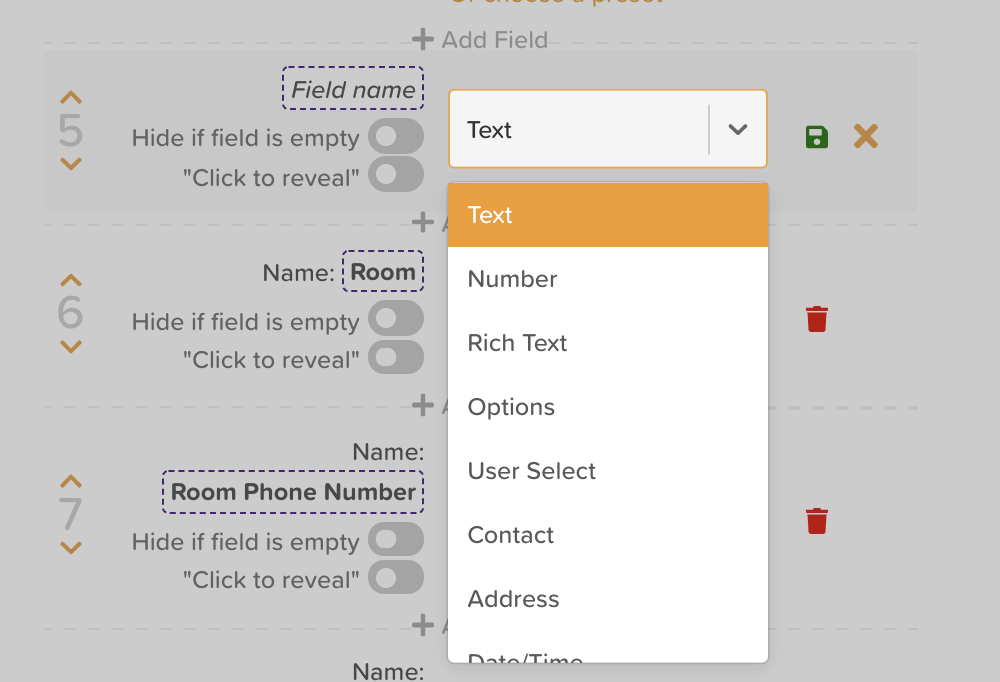
You can customize how data is captured by selecting from different field types:
TEXT – Basic text entry.
NUMBER – Numeric values only.
PHONE NUMBER – Use the country code (e.g. +1) to format correctly.
RICH TEXT – Supports photos, videos, file attachments, tables, links, and text formatting.
LIST OPTIONS – Create single- or multi-select dropdowns (e.g., Race, Religion, Gender), with optional custom colors.
USER SELECT – Choose from your Service User or Staff list (e.g., Case Worker or Roommate).
CONTACT – Select from your saved Contacts (e.g., Emergency Contact, Doctor).
ADDRESS – Multi-line entry for addresses. This will display a Google Maps image. Use the "click to reveal toggle" if you want the address and image to only display when clicked.
DATE/TIME – Choose to include date, time, and/or recurrence (e.g., Care Plan Review Date: 10/06/2024; 10:00 AM; Semi-Annually).
NAME – Asks for First Name & Last Name.
LINKED – Pulls data from other areas of StoriiCare (e.g., Participant's Medications) OR might be linked to database tables (e.g., Participant's Ethnicity, Participant's Religion, Participant's Gender).
Face Sheet Toggles
HIDE IF EMPTY – Hides unpopulated fields for a cleaner, more compact view.
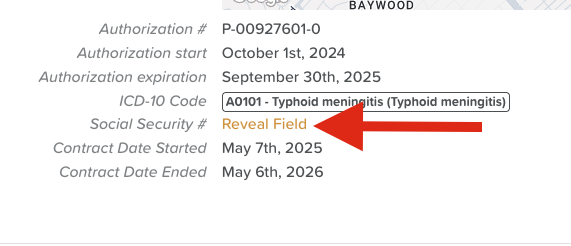
CLICK TO REVEAL – Protects sensitive data (e.g., Social Security Number) so it only appears when clicked.
SHOW IN ANALYTICS – Enables reporting and insights based on this field’s data in the Analytics section.

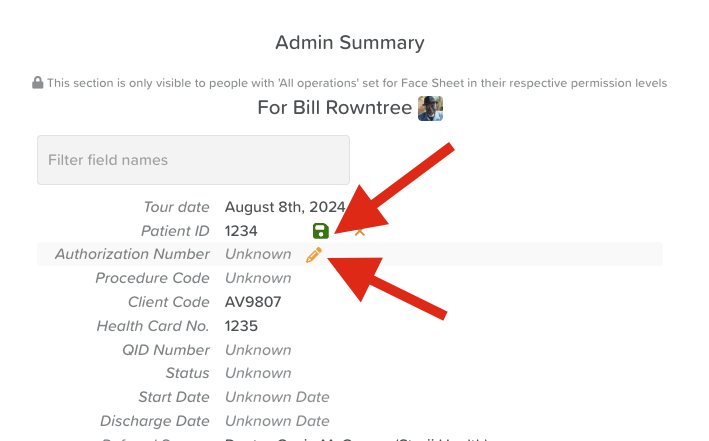
Updating Field Data in the Face Sheet
To edit a specific field’s content (not the template): hover over the field, click the Pencil Icon, and update the entry. This lets you manage service-user-specific information while maintaining a consistent template.
⚠️ Important: When users remove data from a Face Sheet field and save the changes, no warnings are issued. Users should take care not to inadvertently delete data.
To save updates to the Face Sheet: click the green Floppy Disc Icon.
To bulk save multiple updated fields: hold the Shift key while saving.
Printing or Exporting the Face Sheet
Accessing the Face Sheet Export
You can print or export a Face Sheet in two places:
From the Exports feature on the main Dashboard.
From a Service User’s Face Sheet, using the Export button in the top-right corner.
Configuring the Face Sheet Export
When exporting Face Sheet data, you can choose exactly which participants, fields, and formats to include.
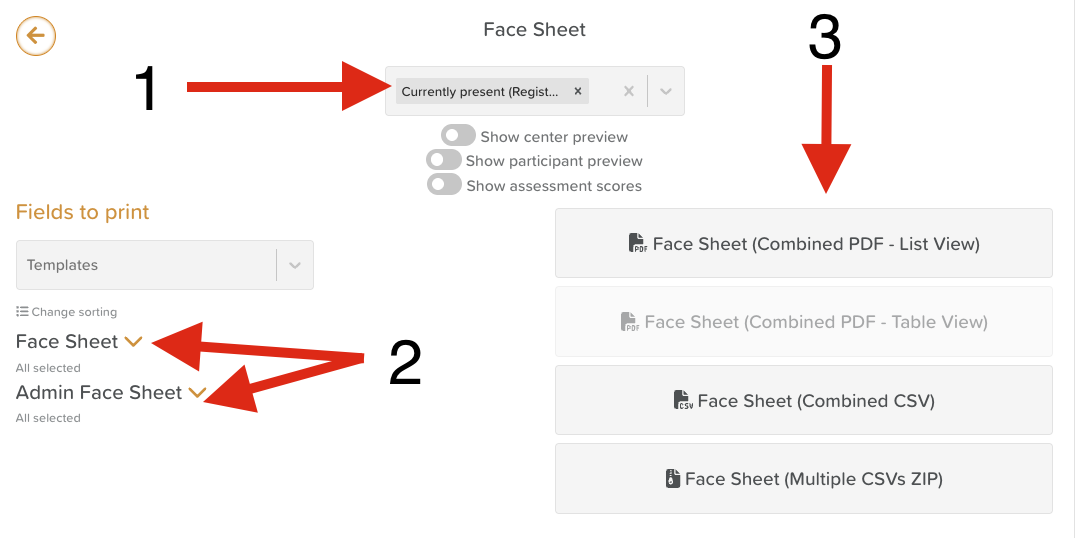
Select Participants
Choose the participant or participant group you want to include in the report.
Expand Face Sheet Fields
On the left-hand side, click the arrows next to Face Sheet and Admin Face Sheet headings.
This will expand the list of all available fields in those sections.
Choose Fields to Include
Use Select All / Deselect All to quickly toggle fields.
Check the boxes for the specific data fields you want to export.
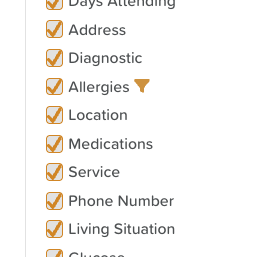
Apply Field Filters (Optional)
Hover over a field to reveal a triangle icon.
Clicking this icon opens a dropdown filter.
From here, you can export based on specific responses.
Example: Instead of exporting all allergy data, you can filter only for participants with a Cat allergy.
Export Options
Once your fields are selected, choose from the following export formats:
Face Sheet (Combined PDF – List View): Prints each participant’s Face Sheet on a separate page.
Face Sheet (Combined PDF – Table View): Displays all selected fields in a single, consolidated table.
Face Sheet (Combined CSV): Exports all selected data into one spreadsheet.
Face Sheet (Multiple CSVs ZIP): Generates individual CSV files for each participant and groups them into a single ZIP folder.
Need More Help?
If you need further assistance, you can reach out to our support team by emailing support@storii.com. Our support team is ready to help you with any questions or issues you may have.